Many people will assemble the computer, but it will not be CMOS set. In this case, it will not install the operating system. The computer is installed, and no system is not enough. The installer must learn the CMOS settings, and the usage is a lot. Let's take a look at the tutorial. Let's go.
There may be some settings for the motherboard that are different. For details, please refer to the CMOS of the motherboard manual. Computer Pepsi friends offer!
one. Understand CMOS settings
How do you get into the CMOS settings? When booting up, there are often such prompts on the screen, it is saying "Press the DEL key to enter the CMOS settings"
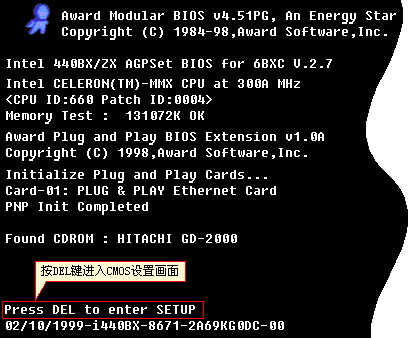
We press the DEL key on the keyboard at this time. What you see now is the interface of the CMOS settings.
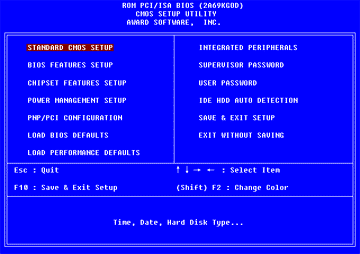
Different computers may have different interfaces, but common ones are AWARD, AMI, and Phoenix. Although the interface form is different, the functions are basically the same, and the items to be set are similar. This is AWARD's CMOS setup screen and is the most common one. In fact, you only need to understand a CMOS setting method, and other things can be bypassed.
There are a lot of parameters to be set under the main interface. Most of the items have already set the correct parameter values, or many of the options have little effect on the operation of the computer, so generally we only need to pay attention to a few key items. .
Usually, when I set up CMOS, I simply do the following steps:
1, set the factory default value 2, detect the hard disk parameters 3, set the floppy drive 4, set the boot sequence 5, if necessary, you can set the password
Second, set the factory settings
Step 1: Set the factory settings.
You see, this item "LOAD SETUP DEFAULTS" means "reset to factory defaults", which is actually the recommended setting, which is the optimal setting under normal circumstances.
Move the cursor to the item with the up and down arrows, then press Enter. The screen prompts “Do you want to load the default valueâ€.

We enter "Y" to mean "Yes, yes", so the above dozens of settings are default values.
If there is an abnormality in your computer under this setting, you can use the other "Load BIOS Setup" to restore the BIOS default value. It is the most basic and safest setting. Settings will not appear under this setting. The problem, but it is possible that the computer performance will not be fully utilized.
Third, automatic detection of the hard disk
Step 2: Automatically detect the hard disk.
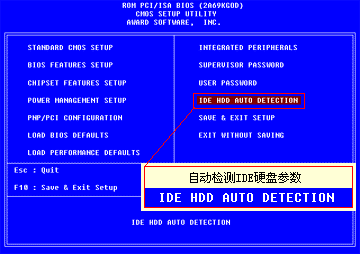
Move the cursor to this item, press Enter, and the computer will automatically detect the hard disk. This is the hard disk parameter detected by the computer.
This is the computer detected the main hard disk, it can be set in three ways: if your hard disk is 6.4G, you can only use 528M in the NORMAL mode; LARGE mode, only 2.1GB; in actual use We all choose the LBA model. Select "Y" This is the recommended option for your computer.
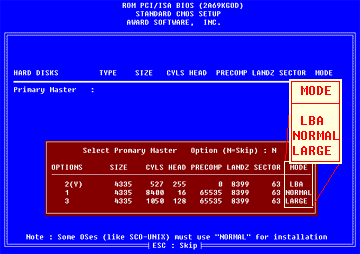
Look, the main hard disk parameters are set. Since this computer has only one hard disk, we will press ESC to cancel the detection.
This computer can connect four IDE devices, which can be connected to four hard disks. These are the four connections. Usually, we only have one hard disk, which is usually set to the first one, and the others are skipped.
If I have two hard drives, then I can use them like this.
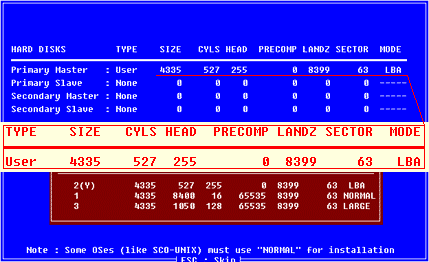
After setting up the hard disk, we first press the ESC key to exit the hard disk detection item. You see, you return to the main setting screen.
Fourth, set the floppy drive
The third step: set up the floppy drive.
Move the cursor to the first STANDARD CMOS SETUP and press Enter.
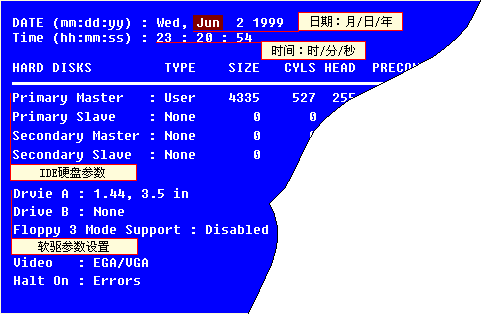
This is the date and time. Now we can adjust them.
This is the hard disk situation. The hard disk parameters we just detected can be seen here. At this time, there is only one hard disk, 4335M. Sometimes when we install multiple hard disks, we want to remove one hard disk. We must operate here and move the cursor to Here, then press Page up and select it as NONE.
This is the floppy drive setup. You see, this computer only has a 1.44M floppy drive. Let's move the cursor to this item and press the "Page Up" and "Page Down" keys to change. Look, this is "1.44M, 3.5 inches".
Then press the ESC key to exit this item.
Five, set the boot sequence
In fact, after setting up the hard disk and floppy drive, the computer will work normally. But usually, we have to consider the issue of booting from A drive or C drive.

Move the cursor to the second item "BIOS FEATURE SETUP" and press Enter.
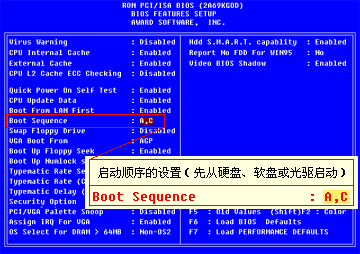
This Boot Sequence refers to the startup sequence of the computer.
If it is set to C, A, that is, first use the hard disk to start, that is, when the computer starts, it reads the system information from the boot area of ​​the hard disk and starts the work of the computer. At this time, no matter whether the system disk is inserted or not inserted in the A disk, the computer ignores it. , only boot from the C drive. Just like the situation you just said.
If set to A, C, the computer will first check the A drive in the plug-in system disk, if inserted, the computer will read the DOS system information from the floppy disk, start the computer;
If we are not inserting the system disk, the computer prompts an error, let us insert the correct system disk; if the computer finds that the floppy disk is not inserted in the A disk, the computer starts from the C disk.
The setup starts from the A drive and it works when we install the software for the new computer.
For example, if you install software on a new hard disk, if the operating system is not installed on the hard disk, the computer from the C disk cannot be started. Even if the system floppy disk is inserted in the A drive, if the computer does not read the A drive, it is useless. At this time, it must be set to boot from the A drive.
Also, sometimes there is a virus on the hard disk, we have to kill the virus, or to check the virus, sometimes it is necessary to start from the A disk.
It is important to save a system disk that is absolutely free of viruses, and be sure to add write protection. When we have installed the operating system, we will start from the C drive, which will speed up the startup.
Now let's set it to the "A, C" startup mode.
Sixth, set the power-on password
There are two places in CMOS where the password is set. One is the advanced user password and the other is the general user password.
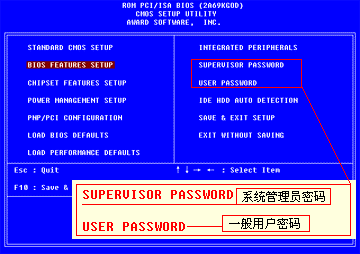
The computer will ask for a password when it starts up, and answer one of the passwords to start the computer; if you want to enter the CMOS settings, you need the advanced user password.
The computer considers the CMOS settings to be highly confidential, preventing others from tampering, while the advanced passwords have higher privileges than the user passwords in the CMOS settings.
Simply put, if both passwords are set, then you can use the advanced password to enter the working state, you can also enter the CMOS settings, and the user password can only enter the work, you can also enter the CMOS to modify the user's own password, but otherwise No other settings can be made for CMOS. If only one password is set, no matter who it is, it has both permissions.
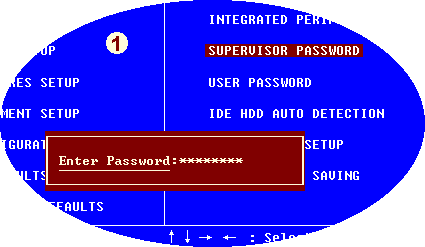
Move the cursor to the password setting, press Enter, enter the password, and then press Enter. The computer prompts you to re-enter the password to confirm it. Enter it and press Enter. If you want to cancel the password you have set, you will be prompted for the password. Just press Enter, the computer prompts the password to cancel, please press any key, the password will be cancelled after pressing the button.
Pay special attention to the fact that once the password is set, it is important to remember. If you set a power-on password for your computer and forget it, you won't be able to work with your computer, which can be awkward.
If you really forget the password, you can't start the computer. For the master, unpack the computer and then CMOS discharge, you can let the computer forget the password, but find someone who is very familiar with the computer hardware and refer to the motherboard manual. Only then can you do it, and CMOS forgets all the set values ​​while forgetting the password, and must set all the settings again. It is best to remember the password!
Seven, save the settings and exit
The most crucial step is to save all the information you just set and select the item "SAVE & EXIT SETUP", which means save and exit.
If you don't want to save the settings just now, just want to check it out, then choose "EXIT WITHOUT SAVING". It means that the exit does not save, then any changes made into CMOS this time will not work.
Here, we choose to save and exit, press Enter, the computer prompts us to confirm, we can enter "Y".
The computer restarts and the setup is complete.
This way the computer will work properly. If there are no special cases, the general CMOS settings do not have to be changed.
Pga Sockets,Pin Pga Socket,Pga Socket Connector,Pga Socket Series
ShenZhen Antenk Electronics Co,Ltd , http://www.antenk.com